Sunday, September 29, 2013

Front suspension - Hubs

Whilst the engine is with AK I have started to put a few bits back together like wheel hubs, front discs and uprights.
Take one wheel hub
Select appropriate race from rebuild kit.
Insert in right place and tap in. This is an outer one so I won't be putting bearing rollers in until I'm ready to fit to upright on car


Repeat for inner race but this can have rollers and oil seal fitted.

A few taps with bearing drift or appropriately sized off cut of tube stock from neighbour's garage and all seated down.

Rollers fully greased up for placing in race - which equally is well smeared with bearing grease.
One seal soaked overnight in oil. Not sure why this is necessary for a plastic and spring unit. I'm sure that was for the old leather style but can't do any harm.

And insert

This seal actually seals around outer lip on upright so it doesn't sit right down on bearing. All the slack will be taken up when it's fitted onto the stub axle and the correct float applied.

Repeat for other side.

Brake discs have also been loosely fitted. covering them in next entry.

Front discs

My brake discs had been stored in grease to prevent rusting, which is brilliant and grim in one.
So out with the rags and white paraffin again and a good scrubbing sees them restored to shininess. After I've attached and torqued to hubs they will be lightly coated with wd40 again to keep the rust at bay whist car build goes on.

So to attaching to hubs, straightforward stuff remembering to use copper grease on all mating surfaces including bolts and  washers. That means should I ever have to undo them again then they won't need my weight on the end of a 4ft bar to undo them.
Copper grease smells a lot better than the graphite grease. (I'm thinking of a side blog entitled "Greases I have smelt"... "Eminent Grises?" Ok, not funny.
Bolt all copper greased up.
All bolts in.

So the final part, torquing the bolts to correct value from Jaguar. Armed with trust well thumbed Haynes manual and torque wrench this is a case of just follow the instructions.


And the last bit - a consistent mechanism for telling myself and the IVA tester that the bolt has been torqued and double checked is a line of nail varnish (bright pink) across the bolts and disc interface. 
I will do this on ALL torqued bolts.
It also lends itself to a visual check as the car notches up miles - any line that is broken or has moved needs attention.

 Belt and braces, both sides done so can be easily seen when the wheel is off too.

Repeat for other hub.

Tuesday, September 24, 2013

Exciting stuff

So having packed the engine onto AK's delivery trailer (looks rather small in there!) ...


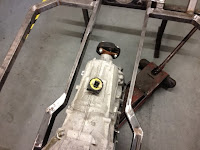
...a week or so later I was  called and emailed some photos by Jon of things taking shape.

This was a watershed phone call as it was the one last hurdle to getting this thing up and running - for them to have the engine was vital to ensuring it was going to work and I wasn't on a hiding to nothing.

So as suspected with my wider than most transmission the key thing he needed to do was to widen the gap between the inner rails to accomodate the transmission girth at an appropriate height.


From the photos this work has been started. Clearly the floor plates are missing and other braces but this is the important part.

Once the rest of the chassis is welded up the body will be mated onto the revised tunnel shape and then 'pre-fitted'

After that the body comes off again and the custom exhausts will be made.